Sunday, February 7, 2010

Zip-loc Bag Chocolate Lollipops


If you are looking for a great Valentine's Day activity to do you with your kiddos that is fun, easy, and incorporates healthy ingredients, look no further, these zip-loc bag chocolate lollipops are your solution. 

I wanted to come up with something that I could, in good conscience, give my kiddo and any other kiddo too.  I also wanted to make something that was easy, required few gadgets and is fun to do make. 

What you need...
1. 1 bag of chocolate-I used Ghirardelli’s 60% cacao, but use whatever you and your family like
2. 1 zip-loc quart or gallon bag
3. Toppings of your choice....

To make these lollipops a bit "healthier", I avoid things like sprinkles that are full of artificial colors and void of any and all nutrition.  What I've noticed is that kids just want to sprinkle something, they will use whatever you've set out.  

My toppings of choice...
-Crushed raw almonds, more nutritious than their roasted counterparts, for nutrition info click here
-Crushed raw pumpkin seeds, for nutrition info click here
-Ground dried fruits such as cranberries, as seen in above photo
-Dried Orange Zest (zest of one orange, baked in 175 degree oven until dry)


But seriously, use what you have that you and your family like to top your chocolate.  Any nut, dried fruit, raw sugar would work.

What you do...
1. First, prepare your cookie sheet with aluminum foil and spray with a light coat of cooking spray.  Wipe the spray across the foil with a napkin or paper towel.
2. Then, place all your toppings and lollipop sticks in small bowls or ramekins...so they are ready for tiny hands.
3. Next, using a double boiler or a sauce pan with a glass bowl, melt your chocolate to a smooth, not runny, consistency.

 
4. Spoon chocolate into your zip-loc bag....cut a very tiny piece off a corner of the bag so that you have to squeeze to get the chocolate to come out.

At this point, you have a couple of options.  If your kiddos are big, they can squeeze heart shapes and circles onto the foil.  If your kiddos are small, you can squeeze the shapes and they can place the lollipop sticks and sprinkle the toppings.


Making the shapes-First, make the heart outline.  Then, "color" in the lines with your chocolate.  Place your lollipop stick at the bottom and be sure to layer a little extra chocolate around the stick to add extra strength to the base.

5. Sprinkle your toppings.
6. Place in the refrigerator or freezer until the chocolate is firm.
7. Enjoy a tasty treat!!!


Thursday, February 4, 2010

Mugs Anyone?

 
$3 ho-hum mug tree from Good Will.


after a few coats of white semi-gloss paint and one coat of water-based polyurethane, it is now a sleek, shiny, makes-me-want-to-drink-more-coffee-than-usual, kitchen accessory.  


i saved on the tree, but i want to splurge on the mugs.  there's something about drinking my morning coffee out of a special cup.  

 
3 of each, all in B's of course.


Wednesday, February 3, 2010

In progress...playroom art


I've been working on some designs for the currently bare playroom walls, specifically something to go in the Ikea Malma mirrors (only $2.99) that I'm painting white. 


I'm still not 100% on the color scheme.  I'm also not sure if I want to alpha/animals, or alpha/transportation, or alpha/food, or a combo of all.  Stay tuned for what we end up with...

Desk Organizer Makeover


This desk wooden organizer has been with me since 2002, when I first purchased it at Target on clearance for a song.  It has spent time in several offices during graduate school, two professional offices, and, most recently, my basement.  I recently brought it up from the depths as I needed an organizer for the kitchen desk to 1) hide pesky cords and 2) organizer notes, papers, and etc.

It had definitely seen better days.  So, I decided to give it a little cleaning as well as a new paint job.

First, I thoroughly cleaned it using dish soap and warm water.
After drying, I sanded the surface and primed it with a basic white primer (whatever we had already opened in the basement).
Then, I painted two coats of white satin paint with sanding between each coat.
After drying, I distressed the corners to let some of the wood show through as well as to highlight its age.
Next, I gave it a thorough dusting and wiping down, let it dry, and brushed on a thin coat of water-based polyurethane.  I did this step to protect the surface from its future contents and to allow for easy-cleaning.
Lastly, I added a new knob for fun.  


In keeping with the FREE spirit of this project, I scrapped my original idea of purchasing new desk components for this organizer, which would have been a sweet, but very unnecessary splurge, and I used some of my current stock including...

Two recycled folders from Target to hold receipts and magazine clippings, a random composition notebook for "ideas", a hallmark notepad with a Maya Angelo quote "You can't use up creativity. The more you use the more you have." for lists, my Target clearance address book, and stacks of Marcel Shurman note cards for quick correspondence. The drawer is full of stamps, post-its, and random batteries.  Hiding in the depths are my ipod headphones and charger. 

There you have it.  Old made new again, for free. I have to remind myself...what do I already have that I can put to use?  

Monday, February 1, 2010

under $20: table centerpiece


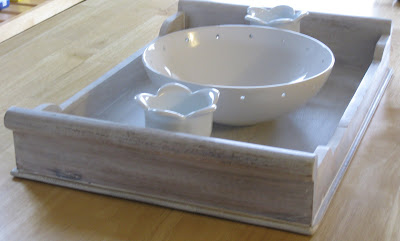
Recently, I put together this centerpiece for my kitchen table.  I love the white distressed wood tray, white ceramic votives, and white bowl.  But, of course, what I love the most is the price of each item.

Tray: 14.98, Target
Bowl: $3.00, local consigment shop
Votives: $1.00 each, consignment shop

Total: $19.98


I love the simplicity and elegance of this centerpiece just as it is.  Although, I think it could use a bit of colorful flair to brighten up the mood a bit.  I'm taking suggestions.  I'm thinking of heading to the local florist tomorrow morning to see what they have in stock and on sale.  I'm hoping to come back with something a little pink, red and white to fit with February's signature colors.

What do you think?  Would you do flowers or something else?
Related Posts with Thumbnails