Showing posts with label home decor. Show all posts

Wednesday, November 10, 2010

Craft Corner Update

In late September, we tore apart our guest room closet in order to convert it to a craft room for moi.  I can't tell you the level of excitement that I have to see all of my craft supplies, fabric, paper and more in one place and somewhat organized.  The room is not finished, but sure has come a long way.


Really, the credit goes to my husband for making this project a reality. 

Here's what we've done so far. 
Walls- We patched the holes, sanded, and painted the walls in Picket Fence from Martha Stewart's Home Depot paint collection.  This new collection has a wonderful color palette (sea glass, anyone? ) and is truly excellent quality paint, especially for the price.  I wanted to paint the walls in a shade of white to brighten the small room, to emphasize my future "inspiration" board and wall decor, to keep colors pure as I work. 

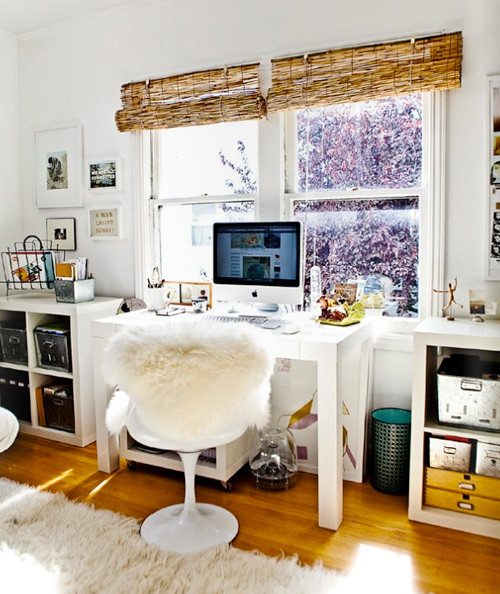
Window Treatment-Using a great tutorial from Jenny at Little Green Notebook, I made this roman shade from a mini blind.  


While it is really cute, bright and functional, I will probably replace it with faux-wood blinds and a DIY valance to maintain our curb appeal.  As the only window in our house without the wood blinds, it looks a bit strange from the outside. 

Shelves and Desk-The wall shelves are from Ikea's EKBY collection.  The bracket and pine-wood shelf are only $7.00.  You can't beat the price; plus, they are functional and look cute too.  I added a 3/8" wooden dowel that I'm going to cut down a bit and use to store my ribbon for easy access!

The desk chair is also from Ikea. It's the JULES swivel chair.  I love it.

Of course, the desk trestles are from Ikea as well.  They are the VIKA ARTUR trestles with shelves.  The desk top is actually two pieces of pine that my husband cut, sanded and polyurethaned.  He cut a hole in the back piece for all my cords.  
Accessories-At this point, I've just moved everything into the room; I've yet to organize, hang wall decor or think about storage solutions (other than the long and tall EXPEDIT that you can't see in the photos...because it's a closet and I think I'm going to have to get on the roof to get my final AFTER shots when it's totally complete).  I plan to use my existing bins, cans, jars, and boxes but I'm just not sure how yet.  The mesh desk organizers on the desk are actually from my office, when I worked in one...I'm happy to have resurrected them.

My biggest stress at this point is determining the wall decor.  It needs to be simple, inspirational, with some functional pieces like a peg or bulletin board.  We have a piece of peg board in the basement waiting for a transformation.  I think I will frame it and mount it to the back of the door.
Stay tuned for the complete Craft Corner sometime in January--that's my goal at this point--perhaps I will get a couple of key items for the room from Santa?

What do you think of this project so far?  In suggestions and/or ideas to help me finish it off? 

Thanks for looking and have a wonderful Wednesday!

Sharing with...
Power of Paint at Domestically Speaking
Penny Pinching Party at The Thrifty Home
Whatever Goes Wednesday at Someday Crafts
Show and Tell at Blue Cricket Design
Frugal Friday at The Shabby Nest
Show and Tell Saturday at Be Different Act Normal

Thursday, November 4, 2010

Before and After: Master Bedroom Makeover

Since we moved into our home about 2.5 years ago, we have made a lot of small changes.  "We" is a loose term here; since, my husband is the one who has done most (if not all) of the hard labor while I work as Project Lead.  We've painted or had painted every room in the house, literally.  This includes ceilings, trim and doors.  We're anal and love the clean look of fresh paint.  We've also changed nearly every light fixture and all of the switch/outlets from beige to white.  We're working on changing the door handles and hinges from brass to brushed nickel (I even spray painted a couple here)...my husband is doing this work as he paints each door.  These are small, time consuming changes, but with big impact and small budget.  While we would love to replace the carpet with hardwood and gut the kitchen and bathrooms, this house, this location and this economy just do not warrant the expense.  So, we're working on small changes with big results. 

For example, I've been slowly pulling together our master bedroom on a shoestring budget. 

Before: 
This is what the room looked like when we moved in, sans the wall decor.

After: 
 This is what the room looks like now.  Well, this is only half of the room.  If I would turn around and take a picture, the other half would not look so pulled together.  I'm still working on that half.  We were tossing around the idea of getting a television for the space, but we decided against it recently.   So, I'm ready to tackle the "back half"! 

Breakdown: 
Canvas
16 x 16 from Canvas People, 
click here for your free 8x10 or to put $55 toward the size of your choice.  I paid around $40 (including shipping) for a canvas that would normally cost double that amount. 
Initial "Quote" Frames
These are from A Few Kind Words, an etsy shop with a truly personal touch and keen attention to detail.  The customer service I received was excellent and they truly offered the exact product I was looking for. The quotes are cheesy, but meaningful for my husband and I.  
K-Keep true to the dreams of thy heart. -Friedrich von Schiller
S-Shall we make a new rule of life, from tonight always try to be a little kinder than necessary. -Unknown
Keep in mind that they will customize the prints to any size, initial and quote that you'd like!
"Headboard"
The headboard consists of 4 vintage shutters that I purchased for $15 each.  Originally, they looked like this.
I sanded, painted and glazed them.  My husband attached each pair together with brackets and mounted them to the wall.  I know it's a bit non-traditional for a headboard, but I love the cottage-y look it gives our bedroom.  I also love that I have a vintage, upcycled, handmade headboard for about $70!

Now they look like this: 
Lamps:
See lamp makeover here.
Bedding
Martha Stewart from Macy's that I purchased a couple of years ago on sale.  I love the bright green and damask; however, I really love that it holds up to all our toddler wear and tear...jumping, potty leaks, greasy hands.
Settee
Gift from my in-laws and cover was made by a local seamstress for a song!
Settee Pillows
Liberty of London from Target-I purchased them on super clearance for $4.98. Still available on Target's website for $11.88, which is still a good price in my opinion. 
Right-Side Night Stand
Purchased from Home Goods on clearance for $104.  I love that I could use this table for a variety of purposes and I love the rustic, manly look. 
Left-Side Night Stand
My splurge.  Purchased from Home Goods for $199.  It has a pull-out writing desk, four drawers, and I LOVE the color in this room.  I feel like the turquoise is a great accent color in this space and really adds to the happy, restful feeling.  
*I'm still working on window treatments.  I haven't been able to decide yet.  I will probably go with long white panels...but not sure if I want shear, canvas, print or ????*

What do you think?  Have you made any small changes=big impact makeovers lately?  If so, please share I'd love to hear some inspiration!
More detailed pictures after the jump...

Wednesday, November 3, 2010

Around the House: Leaves


Perhaps it comes from growing up in a forest, but I love leaves.  The crunch they make under your feet, the smell they have after a fresh rain and the way they scatter in the wind, brings back fond childhood memories.  
Here are a few items that will put leaves inside your home this season.

1. leaf ornaments, $4.00
7. leaf dish, $14.00

Monday, September 27, 2010

Closet to Craft Corner

Hello. I'm very excited to announce that we've broken ground on converting our guestroom walk-in closet into my "official" craft corner and office.  I'm really thrilled by this even though the room is, of course, the size of a closet.  We decided that since it is unlikely that the room will be used for at least a few years by a potential third child, especially since we need have a second one first; so, I've been dreaming of a corner to put all my craft and creative stash that's pretty, inspiring, and a little hidden. 

This is the room now.

Here's my inspiration.
{via Rue, a new online design and decor magazine}

{decor8}

Stay tuned for our progress...

Tuesday, September 7, 2010

scenes from the looong weekend.

Quintessential BBQ dinner.  The summer send-off and farewell.

Make these zucchini fritters.  Seriously, they're delicious and this recipe makes a plethora.
Mmm.

What's a long weekend without good friends and fun.

&

Some quick crafting.
(This was super simple and quick.  I had an old silver frame that I spray painted a glossy white, glazed with chocolate souffle glaze and attached some hemp twine with a few o-ring screws.  I made some decorative clothespins using this technique and attached it to the wall with a couple of Command Picture Strips.  I'm planning to put up a few of my favorite recipes using these recipe cards.  It doesn't get any easier than that.) 

&

Some successful craigslist hunting.

Soooo what did you do this weekend?

Sharing with...
Get Your Craft On with Today's Creative Blog
Talented Tuesday at My Frugal Family
Made by You Mondays at Skip to My Lou

Tuesday, August 31, 2010

Paper Crafted Frames Tutorial


Today, I'm going to share a little tutorial with you to make cute and thrifty wall art and/or picture frames from $1 Michael's wooden frames, craft paper, Matte Mod Podge and a little glazing paint.


If you remember this post, where I shared a little master bathroom updating and a plan for a project gone awry, the above photos show the finished project.  Each frame is backed with a little piece of tan linen and I attached the coral (from my husband's boyhood collection) with white embroidery floss. 

If you would like to make some of these frames for yourself or to use as gifts, follow this simple for tutorial.

First, begin with a $1 square, wooden frame from Michael's or any craft store.  
Mine is spray painted black, but you can simply use the natural wood to save a step.

Using an X-Acto knife, cut an outline of the frame in your craft/scrapbook paper. 

It's okay if they edges aren't perfect as everything will be buffed out later. 

Now apply your Mod Podge to the back of the paper and smoothly adhere it to the frame.  Allow to dry completely.

After drying, apply the top coat of Mod Podge and allow to dry completely.  Then, most importantly, use a sanding block to sand the paper edges until the are smooth along the wood edge.


Lastly, to create a worn and custom look, use a brown or black tinted glazing paint (I use Ralph Lauren in Chocolate Souffle) and brush it all over the frame.  After a minute or two, wipe the glaze down and concentrate on keeping glaze in your "imperfection" areas.  


Your finished product will look like this. 


I hope this little, but picture laden, tutorial inspires you to create some simple and thrifty paper-crafted frames!

Sharing with...
Get your Craft On at Today's Creative Blog
Just Something I Whipped Up at The Girl Creative
Made By You Mondays at Skip To My Lou
Talented Tuesdays at My Frugal Family
Feature Yourself Friday at FingerPrints on the Fridge

Thursday, August 5, 2010

Budget Master Bath Makeover Part #1

This is an image of the master bathroom before we moved into our house.  

Nothing too special, but roomy and functional.  We were really happy to find double sinks, a separate shower, and garden tub.  The original builder's grade oak cabinets had been painted black, which was fine with us since we're not big fans of honey oak in the first place. 

This is an image of our master bathroom now.  Honestly, the only major changes we have made to this room are painting the walls and removing the large mirror and replacing it with two silver-framed mirrors for $29.99 each.  Truly, the mirrors really upgraded the look and feel of this room, giving it a more custom feel. 
We kept the chrome/white ceramic faucets and paired them with similar accessories (originally from Walmart) that we actually had used in our apartment.  The chrome and white fixtures were purchased at Lowe's on clearance for less than $5.00/item. 
The paint, mirrors and fixtures have been completed for over a year, but I'm finally getting around to pulling the room together with wall decor and other fun accessories. I found this little painting at a local consignment shop for $6.00.  I loved the bright colors, dreamy landscape and ornate frame.  I promptly sprayed the frame black to match the cabinets and placed it on the wall between our two mirrors to brighten up my early mornings. The "savon" tin is a recent purchase from Target-it came as a set of two for $9.99.  I like the vintage feel and the white, black, light blue color scheme.  These three colors are what I'm using to complement the soothing "lime sorbet" paint color.
This is my idea of budget-friendly wall decor.  I purchased a pine wood plank (that they cut into four squares for me) from home depot, primed it, and spray painted it black.  After some distressing and a little amateur design painting, I placed these on the bare wall above the toilet.  I had wanted to use the space for some extra shelving, but I reconsidered...I envisioned my seriously curious toddler climbing on the top of the toilet to reach the shelves.  As you can see, the extra Target tin has landed on the top of the toilet, which is perfect because it is virtually indestructible by the kiddo. 
This little area (ledge above the garden tub, which I won't be sharing because it is full of kiddo toys) is still in progress.  I had created this...
which was a "shadow box" frame of my husband's childhood shell/coral collection.  However, this project quickly met it's demise when it promptly and unexpectedly plummeted to the ground and shattered.  Thankfully, the shells and corals were spared.  

My new plan is to create three frames similar to the one resting on the towel bar above and place a dangling shell/coral in each one.  This triptych will hang above the towel bar.  
The only other update to this area is the "spa blue" basket that I recently spray painted to pull in more blue and a boldness.

That's the progress so far.  Other updates to come are...
a "fake" roman shade valance for the window using this fabric that I purchased at a Jo'Ann's liquidation sale, which is on target with this budget makeover. 
 &
Plus, a shower curtain to hang in front of our glass shower doors to "camouflage" the area when not in use.
&
New bath mats crocheted from old cotton sheets.

Stay tuned for the final "reveal"!

Sharing with...
Show and Tell at Blue Cricket Design
New Friend Friday at The Girl Creative
Feature Yourself Friday at Fingerprints on the Fridge
Frugal Friday at the Shabby Nest

Thursday, July 22, 2010

before and after lamps

I can't believe it's been 1.5 weeks since my last post.  Maybe it's the heat, but I've been lazy and uncreative. 

However, recently I made over two lamps for our bedroom.  I've been slowly pulling it together, but instead of purchasing new lamps to match the new look, I made over the one's I had. 

Before: 

After 1 Coat of Primer: 

After two coats of white Krylon spray paint and Ralph Lauren "brownish"(I can't remember the exact hue) glaze. 
I purchased two shades from Target for $14.99. 

What do you think?

Parties I'm Linking To Today: 
Strut Your Stuff Thursday at Somewhat Simple
Transformation Thursday at the Shabby Chic Cottage
Get Your Craft On at Life as Lori
Power of Paint at Domestically Speaking
Penny Pinching Party at The Thrifty Home
Related Posts with Thumbnails