Wednesday, January 13, 2010

Laundry Room Makeover: Cubby Storage


When we first moved in to our house about 20 months ago, our very first project was to paint and replace the floors in the laundry room. But, that is where we stopped. We added the washer, dryer, a trashcan, and some cheap mdf storage cubbies for shoes, laundry detergent, etc. Lately, I've been itching to make it more functional and less sterile. I want something like this wall storage from potterybarn.com for keys, wallets, change, and other assorted junk that collects. It's my first "laundry room project" desire.

Other goals for the laundry room:
1) Decide whether or not to stack the washer/dryer.
a. If stack, build-in cabinets next to washer/dryer on bottom and top.
b. If not, make countertop similar to the one the youngsters did at younghouselove.com.
Click here to see. Then, hang cabinets above washer/dryer for extra storage.
2) Find more aesthetically pleasing shoe storage to replace the mdf storage cubbies.
3) Find cheaper alternative to the PB cubby storage.

Like,


etsy shop: elizabethwrensvintage

or


etsy shop: AMradio

or


etsy shop: snughomeinteriors

or maybe something even more functional with hooks?


etsy shop: UpOnTheShelf

I don't know...what do you think? How about you...any projects your working on lately?

i heart knobs.

Knobs are a perfect method of adding your personal style to a piece of furniture and built-in cabinets. They are usually budget-friendly and are always easy to install, which provide a quick and easy method for updating your look for even the most inexperienced DIYer. For me, I love accessories and I love pulling a room together with unique knobs that complement the decor, but don't necessarily "match".

The following are a couple of knobs from my home.


Brockhampton Knob, Blue, Anthropologie, 2.95
*Prepping up the Avington Coffee table from Target*

Liberty Acrylic, Target, 4.99 or 18.99 for 4
*Adding some class to the Warwick Console Table from Home Decorators

What do you think of these? Love the knobs and had to have them for 2.95, but not sure I love them on my cheapo lowboy/credenza. I may have to keep looking for the perfect knob for this piece.

What are your favorite knobs?


Tuesday, January 12, 2010

Innumerable Necklace by Anthropologie


I found this necklace today while looking at Anthro's new arrivals. I absolutely love it. The petal flowers and colors evoke a vision of Spring in my mind. It's chunky and delicate at the same time, which is right on trend. I can see myself wearing it with jeans and t-shirts everyday, just to feel dressy and whimsical. I've got to have it.

Have you seen any must-haves yet among the new spring arrivals?

Oatmeal-Chocolate Chip Cookies

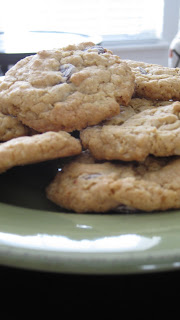
Well, I've convinced myself that oatmeal cookies are healthy. They are, right? The following is an oatmeal cookie recipe with semi-sweet chocolate chips added because everything is better with chocolate. That's a fact in my house at least. I baked up these cookies and made a couple of recycled can containers to tote them to a play date today with a couple of good friends and their kiddos.

What you need...
1 cup flour
1 cup quick cooking oats
1/2 tsp baking powder
1/2 tsp baking soda
1/4 tsp salt
1/2 cup unsalted butter, softened
1/2 cup sugar
1/2 cup light brown sugar
1 large egg
1 tsp vanilla extract
6 oz of semi-sweet chocolate chips, about half a bag

What you do...
1. Preheat the oven to 375 degrees.
2. Mix together the dry ingredients and set aside.
3. In a separate bowl, cream the butter and sugar with a mixer on medium speed, mix until the butter/sugar combo is like a nice creamy spread. Then, add the egg and vanilla. Mix again on medium speed for 30 seconds or until well-combined.
4. Slowly add the dry ingredients to the creamy mixture while mixing on low speed. Mix until all dry ingredients are well-combined and a nice dough is formed.
5. Stir in the chocolate chips.
6. Place on a lined cookie sheet (with a silpat or parchment paper) and make for 10 minutes. Remove from oven and let cool on a rack. Store in an airtight container with slice of bread to prevent drying.
7. Enjoy some sweet deliciousness and a little healthy oats!


Monday, January 11, 2010

Ribbon Memento Board

A couple of weeks ago, my mom brought over this old frame from her basement.


It was perfect timing because I needed something to add height to a new credenza that I had purchased at super discount for the living room. As usual, I wanted to use materials that I had laying around the house already in order to 1) save $ and 2) not have to go out in this cold weather with the kiddo.

So...I came up with a Ribbon Board. I had some foam board, leftover fabric, and ribbon from the dollar bin at Michael's in my stash of craft supplies.


So, I cut a piece of foam board to fit the frame and I stapled the fabric to the foam board using a staple gun and 1/4 inch staples. Then, I used a hot glue gun to attach the ribbons (I used the glue gun so it would be easy for me to remove the ribbon in case I wanted to change it up a bit later).


There you go. A quick and easy Ribbon Memento Board that is perfect for displaying photos and memorabilia. You can find similar a idea/tutorial here, but there is also a great tutorial in the Martha Stewart Holiday, Handmade Gifts magazine from 2007. It was really my inspiration for this project. When I get a chance, I will put it up here--I've had no luck finding it on her website.

Do you have any similar projects to share?
Related Posts with Thumbnails