

Tuesday, November 30, 2010
Guest Post at Young and Crafty
Festive Garland Round-Up

1. DIY Fabric Fringe Garland via Ruffled
2. Pom Pom Garland via One Pearl Button
3. Pom Pom Garland via One Stitch Two Stitch
4. DIY Printed Paper Garlands via Going Home To Roost
5. Beaded Wood-Veneer Garland via Martha Stewart
6. DIY: Felt Garland via mod kid likes
7. Cupcake Liner Garland via 100 Layer Cake
Are you in the mood to make a little garland? If so, check out the above tutorials for a lot of lovely, festive inspiration! You can also check out my Book Page and Grocery Bag Garland.
Do you have a favorite DIY garland? If so, post it here in the comments. Thanks and have a happy day!
Monday, November 29, 2010
Bookpage & Grocery Bag Garland


After drooling over my West Elm catalog over the past several weeks, I've become inspired to make print-based holiday decorations like a mad fool. This book page and grocery bag garland is the first among several projects that I've made using the same vintage, broken spine book. I love the fact that I've made some great-looking holiday decor with re-purposed and recycled materials and spent only a few dollars in the process.
To make this garland, I first adhered the book pages to the blank side of brown paper grocery bags. Then, I cut the bags into strips just wide enough for the shape punches in order to maximize the punchable surface area. Next, I punched a TON (not exaggerating here) of stars and scalloped circles (using these punches) and stitched them together using a simple straight stitch on my sewing machine. (I know it may seem a little nerve racking to sew together small paper shapes, but it is seriously easy. I just keep feeding the shapes under the foot and the machine does the rest!)

Doesn't it look pretty on the tree? I just love these neutral colors against the green of the Frasier Fir. I'm almost finished making enough to cover the whole tree....just one more paper bag to go I think!

Sharing with...
Made by You Mondays at Skip To My Lou
Just Something I Whipped Up at The Girl Creative
Making the World Cuter Monday at Making the World Cuter
Get Your Craft On at Today's Creative Blog
Strut Your Stuff at Somewhat Simple
Frugal Friday at The Shabby Nest
Wednesday, November 24, 2010
Happy Thanksgiving!
Happy Thanksgiving!
Wishing you a wonderful day filled with family, friends, food and fun. I'm looking forward to spending the morning with my two guys, eating the spinach and prosciutto breakfast strata that is prepared in the refrigerator right now. If it's delicious, I'll share it with you next week! Tomorrow evening, we'll be spending it with family and noshing on some of these among other things.
Here are a few non-traditional recipes that I'd love to try for Thanksgiving or any other day for that matter.
 | |||
| Butternut Squash Galette via Queenie Takes Manhattan |
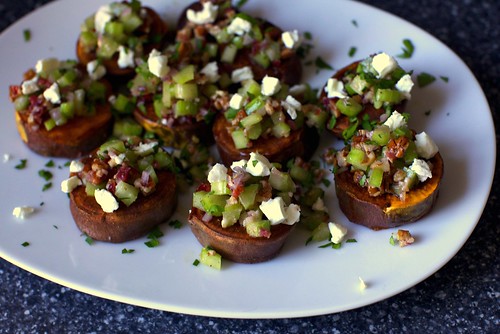 | |
| Sweet Potatoes with Pecans and Goat Cheese via Smitten Kitchen |
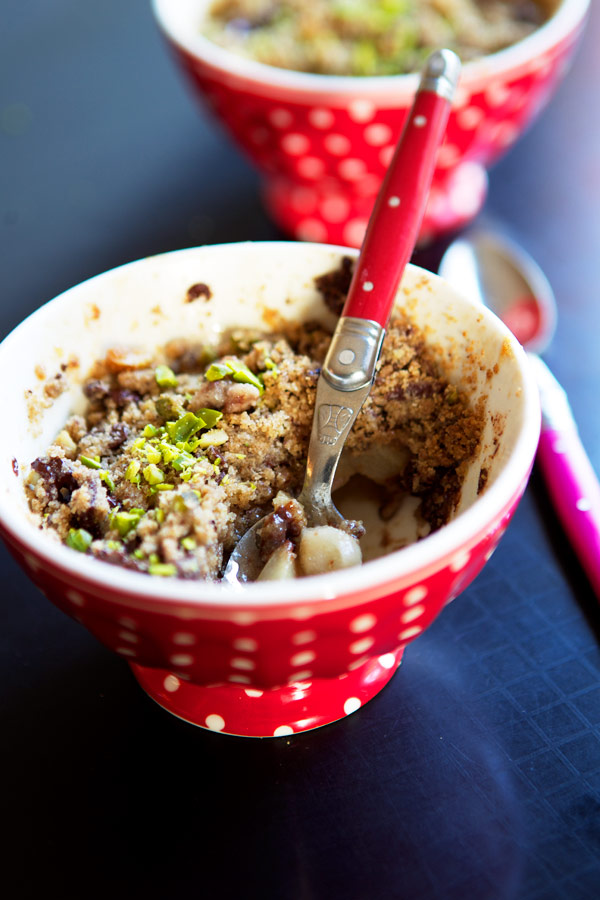 |
| Pear, Apple and Chocolate Crumble via La Tartine Gourmande |
Have a wonderful weekend! I typically don't give out advice, but over the "biggest shopping weekend of the year" remember, less is more.
P.S. I'm looking forward to the next four weeks of holiday goodness. I've been working like a busy bee to finish several simple, yet lovely, Christmas crafts for you!
shop local, buy handmade (holiday edition #1)
I'm back with another Shop Local, Buy Handmade edition where I share local Etsy shops crafting up some wonderful items. Today's shops offer some wonderful gift options for the jewelry-lover, crafter, and/or art lover; basically, this edition features items that I would love-Ha! I'm so excited for these features! You can find other Shop Local, Buy Handmade posts here, here, and here. Dear readers-if you know of a great local (St. Louis area) crafter, please send me their site and info as I would love to share them here.
Today, I'm featuring three local shops: Julia's Adorabowls and Jewelry, Handbehg Felts', and Sometimes I Swirl.
 | |
| 1, 2, 3, 4, 5, 6 |
I can't say enough how I excited I am to have found this site. I love the delicate design of each piece; there are seriously like 12 things on my "wish list". Julia's Adorabowls and Jewelry offers lovely pieces at an even lovelier price point, which makes it a great option for your gift list this season!
 |
| 1, 2, 3, 4, 5, 6 |
Among other things, I would really like to make this and this with felt balls. I love knowing that I can pick up my supplies from a local seller or, perhaps, Santa will fill my stocking with them. If you have an interest in felt crafts (if your not sure, Handbehg Felts' offers idea sheets) or if you just think these beauties would look great in a decorative bowl, definitely check out this shop!
 |
| 1, 2, 3, 4, 5, 6 |
I really love these. I need 1 for my little guy's "big boy" room and 5 for a nursery (as in whenever we decide to have a #2) and 2 or 4 for my sewing room. These prints are unique--the perfect way to add a little whimsy to any room.
Dear readers-if you know of a great local (St. Louis area) crafter, please send me their site and info as I would love to share them here on the30girl!
Tuesday, November 23, 2010
Sweet Potatoes
For our annual Thanksgiving dinner at my Uncle Tom's, I'm preparing the sweet potato dishes.
I've decided on the following two...
One sweet
 | ||
| Martha Stewart's Sweet Potato Pie with Pecan Topping |
I made this pie last year for Thanksgiving dinner with my in-laws and it was a delicious alternative to plain sweet potato pie. I'm looking forward to making it again this year! I will be serving it with fresh whipped cream.
&
One savory
 | ||
| Asiago Cheese Sweet Potatoes from fresh365 via mint |
As soon as I saw this dish, I knew that I wanted to make it over the Thanksgiving holiday. When I was talking to my Uncle regarding what I should bring on Thanksgiving, I definitely mentioned more than once how I would be more than willing to bring sweet potatoes...I guess it was a slightly selfish offer. But seriously, don't those look delicious?
So, how about you? What are you making for Thanksgiving? Do you visit family and friends or do you prepare the big feast? I'd love to hear your recipes and traditions!
Monday, November 22, 2010
Holiday from Shutterfly

2009

2008
For the past two years, we have ordered our Holiday cards from Shutterfly. After having our little man, Shutterfly cards were the perfect choice for the photos that I wanted to send to family and friends at Christmas. I've been impressed by the array of designs, sizes, and Christmas card options that Shutterfly offers and expands each year. Furthermore, I love that I can save my card projects to review and, ultimately, select my favorite. Plus, it's an added bonus to be able to check out the card I sent the previous year (it's seems I have no idea where I put the extras around here).
When I heard that Shutterfly was offering bloggers 50 holiday cards in exchange for a review of their products, I couldn't pass up this opportunity to voice my delight in their products, service and competitive price options! Sign up here if you'd like to participate along with me!
Here are a few holiday cards I'm looking at for this year!


In addition to my holiday cards, I've also begun the tradition of giving a calendar at Christmas to Grandma. This year, I may be giving one to us too! Calendars are such a great way to share your favorite photos of the year, while giving a very practical and always in need gift!
Furthermore, I've also given a few photo books over the years; Shutterfly has excellent, modern designs, provides great quality and speedy delivery on these delightfully sentimental gifts! This year, I already have plans to give a couple more!

Lastly, don't forget Shutterfly for announcing your latest arrival, they have a wonderful selection of baby announcements as well!

For all your holiday needs this year, definitely check out these great options from Shutterfly...I know I will be!
Sunday, November 21, 2010
Friends and Family at Chronicle Books
 |
| here |
I love these books for the little ones. Delightful illustrations and wonderful themes for babies and toddlers.
 |
| here |
 |
| here love the themes in this books and the title is so cute. Plus, the author is a fellow Missourian. |
 |
| here |
 |
| here |
I've been wanting to check this out; I'm interested to see what I missed in times gone by. I think this book would make an excellent gift paired with one of the "things.

 |
| here |
Chronicle Books to find these and many, many more wonderful titles and use code FRIENDS for 35% off and free shipping!
Pumpkin Chocolate Chip Cookies

Recently, I made 48 of these cookies to keep and give. I don't know about you, but I never tire of pumpkin or chocolate. Since I can't help but try to infuse healthy ingredients into my sweet recipes, these cookies are made with little butter and a ton of oatmeal. Actually, the recipe is based on my Oatmeal Carrot Cookies.
2 cups all-purpose flour
2 cups quick-cooking oats
1 tsp baking powder
1 tsp baking soda
1 tsp ground cinnamon
1/4 tsp nutmeg
2 cups quick-cooking oats
1 tsp baking powder
1 tsp baking soda
1 tsp ground cinnamon
1/4 tsp nutmeg
1/4 tsp ground cloves
1/2 tsp salt
1/2 cup softened butter, unsalted
1 cup pumpkin puree
1 cup sugar (I use 1/2 cup to decrease the sugar content)
1 cup brown sugar
2 eggs
2 tsp vanilla
1/2 cup softened butter, unsalted
1 cup pumpkin puree
1 cup sugar (I use 1/2 cup to decrease the sugar content)
1 cup brown sugar
2 eggs
2 tsp vanilla
8-12 oz 60% cacao chocolate chips (or whatever you desire)
Whisk together dry ingredients (flour, oats, powder, soda, cinnamon, nutmeg, cloves and salt) and set aside. In a separate bowl, cream the butter and sugar, add pumkin, eggs, and vanilla. Add the flour mixture and mix until just incorporated. Stir in chocolate chips. Place spoonfuls of dough on baking sheet (lined with a silpat or parchment paper) 2 inches apart and bake at 375 degrees for 10-12 minutes. Makes about 48 cookies.
Whisk together dry ingredients (flour, oats, powder, soda, cinnamon, nutmeg, cloves and salt) and set aside. In a separate bowl, cream the butter and sugar, add pumkin, eggs, and vanilla. Add the flour mixture and mix until just incorporated. Stir in chocolate chips. Place spoonfuls of dough on baking sheet (lined with a silpat or parchment paper) 2 inches apart and bake at 375 degrees for 10-12 minutes. Makes about 48 cookies.
My son loves these cookies; I think I could make them even healthier with some wheat germ, ground flax seed, or something.
If you're hungry for more pumpkin, click here and here for other recipes I've shared this fall. I'd love it if you shared your pumpkin favorites!
Sharing with...
Just Something I Whipped Up at The Girl Creative
Made By You Mondays at Skip To My Lou
Take-A-Look Tuesdays at Sugar Bee Craft Edition
*Update 11/23*--My son and I just made another batch of these cookies this morning. We used about 3/4 c unsalted butter instead of 1/2 c. We also used the full 2 cups of sugar and about 1.5 cups of pumpkin/carrot puree mix. This batch is by far the best--the added butter and sugar makes a big difference in taste albeit the added fat and calories. I'm taking bags of these to the neighbors today!
Thursday, November 18, 2010
A Thankful Book, A Thanksgiving Tradition

As our third Thanksgiving as a family with child, I wanted to begin some traditions that we would do each year to express our gratitude for our many, many blessings. I thought the concept of a "Thankful Book" would be able to grow with our kid(s)--it's perfect for a toddler and quite appropriate for a teenager as well, right? Each year our Thankful Books will look different (taking on a different shape, size, style, etc), especially as the kiddo is able to participate more in the actual creation.
This year, I made the little man's Thankful Book from card stock, his miniature hand stencil (aren't little hands ADORABLE!, a sharpie, and some baker's twine. My husband and I will have identical copies soon.
This year, the three of us will be "decorating" our Thankful Books together Thanksgiving morning. It will be a fun activity to do as a family!
This is a simple craft and tradition, but one with purpose--to reflect on our thanksgivings!
What Thanksgiving traditions do you have with your family? I'd love to hear your thoughts and ideas...
Sharing with...
I'm Lovin It at Tidy Mom
Wednesday, November 17, 2010
Be a turkey this Thanksgiving: DIY Turkey Beak

Gobble, gobble. Thanksgiving is a nearly a week away. I know we have already moved on to the Christmas and holiday season, but I have been thinking of ways to bring fun and tradition to our young family's Thanksgiving. I have two crafts to share with you this week, one whimsical and one tradition. The former is this here turkey beak. I made this on a whim and the little guy and I have been gobbling all over the house. We even got Daddy to participate, sans photo, of course. I'm halfway inclined to make one for every guest at my Uncle Tom's annual Thanksgiving Feast.
Making this Turkey Beak was super simple. Here's the play-by-play.

1. First, I wrapped a 3/8" wooden dowel (I have a ton left over from this project) in a strip of fabric and secured it with hot glue. You could skip this step or paint your dowel if you'd like.
2. Then, I cut two pieces of yellow felt for the beak and two pieces of maroonish felt for the wattle.
3. To assemble, I hot glued the dowel to one piece of yellow felt and glued around the perimeter, leaving a space to insert the wattle. Then, I glued the wattle in place.
4. Lastly, I used brown and white striped baker's twine and blanket stitched around the edges.
There you have it. A quick and simple way to bring some whimsy to your thanksgiving!
Stay tuned for a our simple Thanksgiving craft tradition tomorrow.
Sharing with...
Whatever Goes Wednesday at Someday Crafts
Categorically Crafting at Someday Crafts
Get Your Craft On at Today's Creative Blog
Sugar and Spice at Seven Thirty Three
Give Thanks and Strut Your Stuff at Somewhat Simple
I'm Loving It at Tidy Mom
Categorically Crafting at Someday Crafts
Get Your Craft On at Today's Creative Blog
Sugar and Spice at Seven Thirty Three
Give Thanks and Strut Your Stuff at Somewhat Simple
I'm Loving It at Tidy Mom
Monday, November 15, 2010
DIY Linen Inspiration Board


As you know, I've been hard at work creating my Craft Closet. Currently, There is a large blank white wall in front of the desk that I intend to fill with inspiration and things that I just like. A while back, I purchased a stack of canvases from Michael's that I put to use making chalkboard canvases to give and keep. With a couple of the leftovers, I made these inspiration boards...I'm looking forward to covering these with likes and loves. If you are interested in making some of your own, check out the following super simple tutorial.
1. Start with two 11x14 canvases.

2. Cut and iron (I sprayed mine with fabric stiffener) a piece of linen a few inches bigger than the area of the canvas.

3. Fold the linen around the canvas, hold tight, and staple (with your handy staple gun) all the way around the canvas.

Take care to fold the corners tight and smooth.


4. If desired, wrap jute twine around your canvas in a design that pleases you. Secure it with hot glue and a tight knot in the back.


5. Fill with lovely things. You can insert items under the twine and/or use map pins to hold your favs.
Sharing with...
Just Something I Whipped Up at The Girl Creative
Made By You Monday at Skip To My Lou
Get Your Craft On at Today's Creative Blog
Remodelaholic's Anonymous at Remodelaholic
Thursday, November 11, 2010
Give and Get is Here: Take a look at my picks for the little man and grab your discount!
I purchase a lot of my son's staple clothing from Gap and Old Navy. Compared to other popular boy's brands and stores, I seem to have great luck with sizing (the pants fit!) and style. Plus, it is seemingly impossible to not find cute items on sale at any given time. This season's Give and Get sale is a great opportunity to stock up on staples and holiday wears at 30% off! The sale runs from today through the 14th; the above link will provide you with a printable coupon and online code! Plus, if you use my link, your 5% donation will go to Feeding America, the largest domestic hunger non-profit in the country.
Here are my picks from Old Navy. Mr. Man is going to look good and stay warm.

Look 1: All Dressed Up
1. Sweater
2. Polo
3. Cords
4. Shoes

Look 2: Night-Night
1. PJs
2. Slippers

Look 3: Snow Day
1. Coat
2. Snow Pants
4. Boots
Look 4: Playdate
1. Sweater
2. T-shirt
3. Oxford
4. Jeans
5. Shoes
How about you? Do you have any picks for the Give and Get sale? I may have a few picks for myself, like these, this and, this.
Wednesday, November 10, 2010
Craft Corner Update
In late September, we tore apart our guest room closet in order to convert it to a craft room for moi. I can't tell you the level of excitement that I have to see all of my craft supplies, fabric, paper and more in one place and somewhat organized. The room is not finished, but sure has come a long way.


Really, the credit goes to my husband for making this project a reality.
Here's what we've done so far.
Walls- We patched the holes, sanded, and painted the walls in Picket Fence from Martha Stewart's Home Depot paint collection. This new collection has a wonderful color palette (sea glass, anyone? ) and is truly excellent quality paint, especially for the price. I wanted to paint the walls in a shade of white to brighten the small room, to emphasize my future "inspiration" board and wall decor, to keep colors pure as I work.
Window Treatment-Using a great tutorial from Jenny at Little Green Notebook, I made this roman shade from a mini blind.

While it is really cute, bright and functional, I will probably replace it with faux-wood blinds and a DIY valance to maintain our curb appeal. As the only window in our house without the wood blinds, it looks a bit strange from the outside.
Shelves and Desk-The wall shelves are from Ikea's EKBY collection. The bracket and pine-wood shelf are only $7.00. You can't beat the price; plus, they are functional and look cute too. I added a 3/8" wooden dowel that I'm going to cut down a bit and use to store my ribbon for easy access!
The desk chair is also from Ikea. It's the JULES swivel chair. I love it.
Of course, the desk trestles are from Ikea as well. They are the VIKA ARTUR trestles with shelves. The desk top is actually two pieces of pine that my husband cut, sanded and polyurethaned. He cut a hole in the back piece for all my cords.
Accessories-At this point, I've just moved everything into the room; I've yet to organize, hang wall decor or think about storage solutions (other than the long and tall EXPEDIT that you can't see in the photos...because it's a closet and I think I'm going to have to get on the roof to get my final AFTER shots when it's totally complete). I plan to use my existing bins, cans, jars, and boxes but I'm just not sure how yet. The mesh desk organizers on the desk are actually from my office, when I worked in one...I'm happy to have resurrected them.
My biggest stress at this point is determining the wall decor. It needs to be simple, inspirational, with some functional pieces like a peg or bulletin board. We have a piece of peg board in the basement waiting for a transformation. I think I will frame it and mount it to the back of the door.
Stay tuned for the complete Craft Corner sometime in January--that's my goal at this point--perhaps I will get a couple of key items for the room from Santa?
What do you think of this project so far? In suggestions and/or ideas to help me finish it off?
Thanks for looking and have a wonderful Wednesday!
Sharing with...
Power of Paint at Domestically Speaking
Penny Pinching Party at The Thrifty Home
Whatever Goes Wednesday at Someday Crafts
Show and Tell at Blue Cricket Design
Frugal Friday at The Shabby Nest
Show and Tell Saturday at Be Different Act Normal
Whatever Goes Wednesday at Someday Crafts
Show and Tell at Blue Cricket Design
Frugal Friday at The Shabby Nest
Show and Tell Saturday at Be Different Act Normal
